Intro
Setting up a basic driving platform on a Linux machine is “easy enough”, provided you have all the information you need. The problem is that the information is scattered all over the internet: on Github, official SCS forums, a few unofficial and obscure ones, several subreddits, etc. This is my attempt at documenting the ridiculous hacks totally legit steps I did, in case someone else finds the information useful (and, of course, for my own reference).
Notes:
- I’m using ETS2 Steam version on Arch Linux, if you’re using a different combination you might need some tweaks.
- This is about setting up headtracking without a dedicated headtracking/eyetracking hardware device (or VR), using just your webcam and some software.
Setting up G29
Setting up a driving platform on Linux with Logitech G29 wheel is fairly straightforward. The first thing to do is to is make sure that the switch on the wheel is set to PS3 and not PS4. Then open ETS2 properties on Steam, and disable Steam Input. If you don’t do this, ETS2 won’t be able to see your wheel as an actual wheel, as Steam Input will show it as a regular controller.
Note: Looks like this step might not be necessary anymore, Steam changelog claims that they have fixed incorrect detection of G29 as a regular controller instead of a wheel, but I haven’t tested it personally.
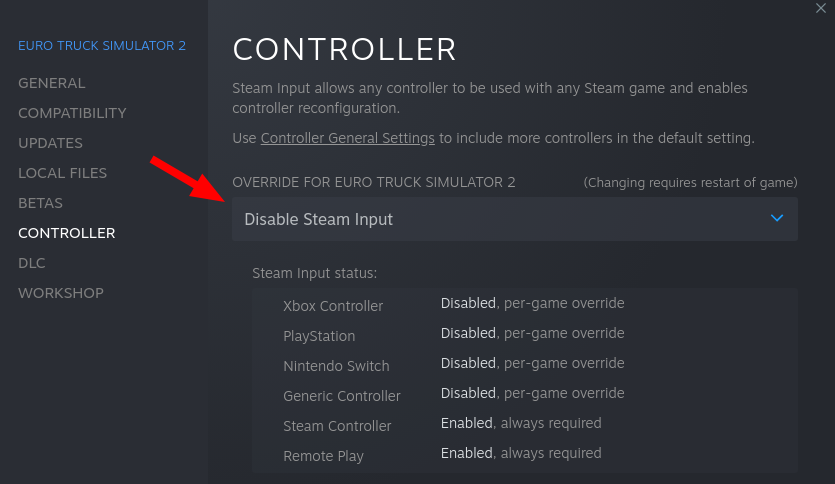 Disable Steam Input, but with a big useless red arrow
Second, to enable all the force feedback stuff on your wheel, you will need to install new-lg4ff-dkms-git and reboot your system. Then you should be able to configure your wheel via oversteer. The only thing that’s not working for me are the RPM LEDs, and I’m still looking for a way to enable them. They are probably very operational, but ETS2 probably needs a telemetry plugin to use them.
On your next ETS2 run, it will recognise the wheel and you can configure it as usual.
Setting up headtracking
Setting up headtracking for ETS2 doesn’t seem to difficult on Windows machines, if youtube videos are any indication. You just install some software, and it pretty much works out of the box. However, FreeTrack output for opentrack is not supported on Linux (at the time of writing this, at least). What is described in this article a really hacky workaround, but I’m documenting it nevertheless as it wasn’t easy to collate the info from various (and incomplete) forum posts.
Installing aitrack & opentrack
First step is installing aitrack, via the PKGBUILD repo.
1
2
3
git clone https://github.com/mdk97/aitrack-linux-pkgbuild.git
cd aitrack-linux-pkgbuild
makepkg -si
If sometimes you get an error while trying to run aitrack, you might need to rebuild/install the package:
1
2
$ aitrack
aitrack: error while loading shared libraries: libopencv_gapi.so.406: cannot open shared object file: No such file or directory
Then install opentrack, which should be an easy task on most platforms. For Arch it is already available in AUR.
Connecting everything
First you need to run aitrack and configure it to output to 127.0.0.1:4242.
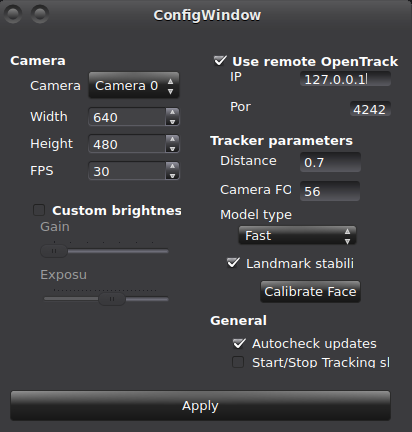
You can also tweak the camera resolution and FPS according to your specs. More is better, but if you don’t have a powerful machine, it may cause some performance issues. Generally speaking though, you’ll get virtually the same performance on lower resolutions and FPS, so it doesn’t really matter much.
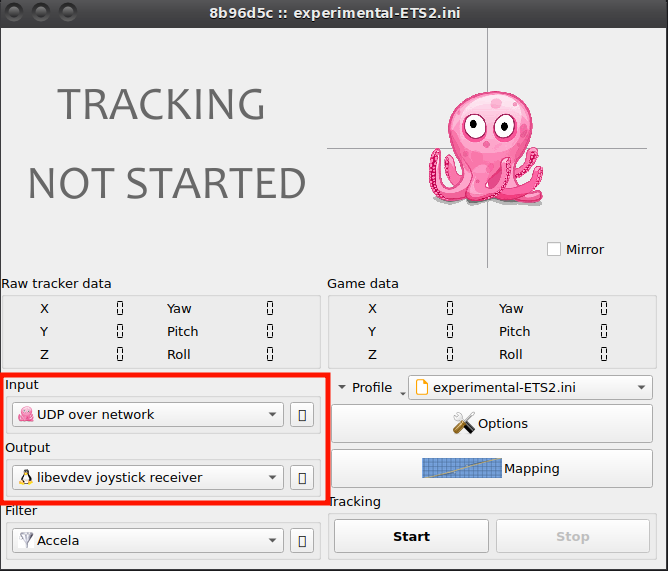
Onwards to opentrack configuration, you need to select “UDP over network” as your input, and in the configuration dialog for it (the weird box-button next to it) use the same port as in aitrack (4242 by default).
Then select “libevdev joystick receiver” for output.
Now comes the difficult part: actually tweaking the tracking in opentrack so you can peek at the rear-view mirrors in the game, but still see the screen in front of you.
First things first, you should assign aitrack outputs to X & Y inputs for your virtual joystick. Note that on my system I had to invert the pitch output (mapped to Y axis), but note that this might not be necessary for you.

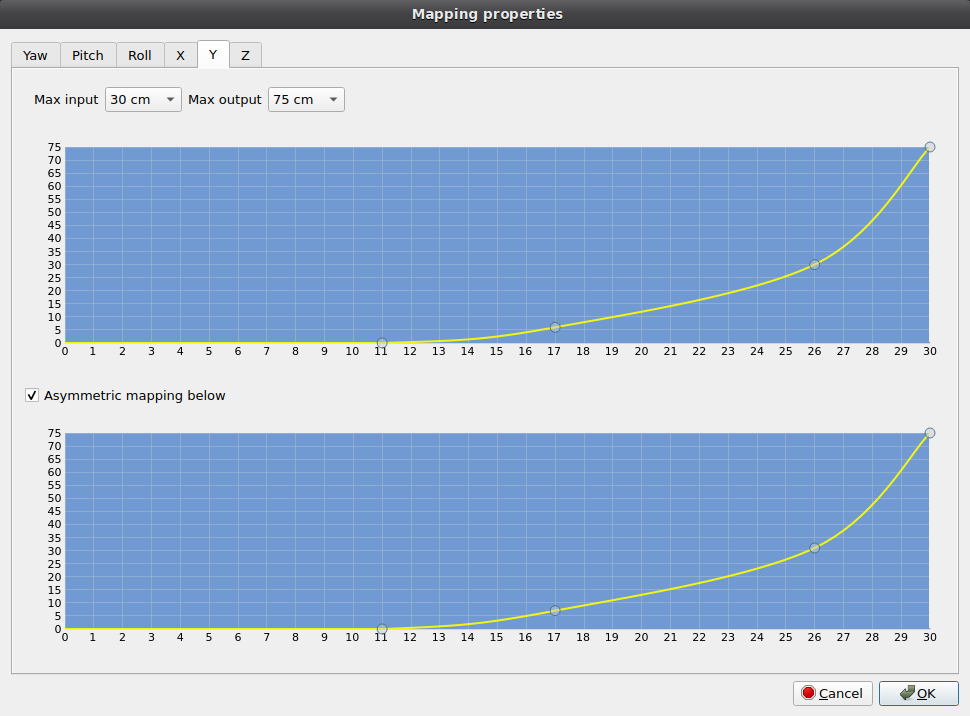
Then, you need to go to opentrack mapping dialogue, and tweak X & Y ranges and curves according to your preferences. Technically, this is actually the last step of this guide, I’m putting it here just so you can check that aitrack and opentrack are correctly linked.
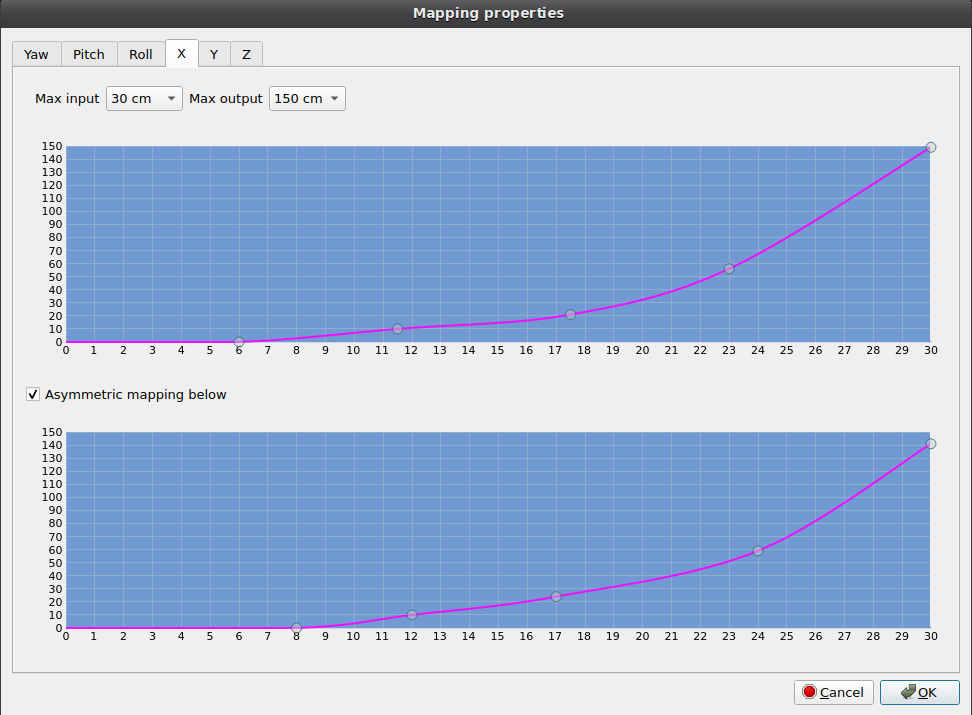
Later on, this will honestly be the trickist part, with a lot of trial and error with ETS2 running and a lot alt-tabbing. The key information to remember:
- Max input and max output determine how much of your head rotation will be represented in the game (e.g. 30cm rotation IRL equals 150cm in-game rotation), which is important because you don’t want this to be 1:1, otherwise you won’t be able to see the screen without some serious eye gymnastics.
- You’ll probably want to have “eased” curves for rotation, with a decent deadzone, otherwise your in-game head is going to behave very jerky and it’s going to be very jarring.
That should be it as far as aitrack and opentrack go, once you start both of them, you should be seeing the pink octopus move around when you turn your head left-right and up-down.
Configuring ETS2
Euro Truck Simulator 2 now has to somehow use this virtual joystick. Unfortunately, it’s not possible to configure it from within ETS2 settings, so you have to edit the configuration files directly. But, in order to do that, you first have to tell ETS2 to use this joystick for input:

Once it’s selected there, just exit ETS2 to save the selection in ETS2 config. Next step is to open ~/.local/share/Euro Truck Simulator 2/steam_profiles/<some random string>/controls_linux.sii in your favourite editor, which should be Vim. Inside this file, we’re just going to tell ETS2 to use inputs from this virtual joystick as headtracking inputs, which - as mentioned - sadly isn’t possible to do witin ETS2.
If you’re not sure what you’re doing, create a backup copy of
controls_linux.siibefore you do anything.
First, check which device number was assigned to your virtual joystick. Most commonly, it will be joy2 (with joy being your actual wheel), but this can obviously vary.

Then, locate lines which have mix headtron, mix headtryaw, mix headtrpitch, and change them to the following:
1
2
3
config_lines[280]: "mix headtron `1 | c_ht_on & (trackiron | hmdon | eyeposon)`"
config_lines[281]: "mix headtryaw `sel(trackiron, trackiryaw, 0) + sel(hmdon, hmdyaw, 0) + sel(eyeposon, eyeposyaw, 0) + -joy2.x`"
config_lines[282]: "mix headtrpitch `sel(trackiron, trackirpitch, 0) + sel(hmdon, hmdpitch, 0) + sel(eyeposon, eyepospitch, 0) + joy2.y`"
Save the file, and you should be done, headtracking should be operational within ETS2. Now it is only a matter of tweaking the curves in opentrack until you get it “just right” for your needs.
IMPORTANT NOTES:
ETS2 may change the configuration file format, so the changes above may not be 100% valid, pay close attention to the actual values!
- Pay attention to the XYZ number within
config_lines[XYZ], don’t change them if they don’t match the numbers shown here! - If the lines are significantly different from what is shown here, the actual changes are:
headtron: only add1 |at the beginning of the value to unconditionally activate head tracking.headtryawandheadtrpitch: only add the last part of the equation:+ -joy2.xand+ joy2.y, respectively. If necessary, replace thejoy2part with appropriate value from your file.
Notes and caveats
- I haven’t been able to configure roll to work smoothly, so I’ve given up on it, as it’s not really all that important. Personally I really only care about being able to check the rear-view mirrors without the need to take my hands off the wheel and play around with the mouse.
- You always need to start aitrack & opentrack before starting ETS2.
- As mentioned at the beginning, RPM LEDs are not working on the wheel, though there are some online resources which seem to indicate that this should be possible to accomplish.
- If you have noticed an error in this guide, or have a way of improving/simplifying it, please let me know via a github issue on this page repo.
Links
Some useful and semi-useful links I ran into while researching how to do this:
- https://wiki.archlinux.org/title/Logitech_Racing_Wheel
- https://github.com/AIRLegend/aitrack/wiki/User-guide
- https://steamcommunity.com/app/227300/discussions/0/648816742950435869/
- http://www.trainsimdev.com/forum/viewtopic.php?f=38&t=227&start=20
- https://www.reddit.com/r/linux_gaming/comments/yx3mfz/head_tracking_on_linux/
- https://github.com/berarma/new-lg4ff/issues/38
- https://github.com/RenCloud/scs-sdk-plugin
- https://modding.scssoft.com/wiki/Documentation/Engine/SDK/Telemetry
- https://forum.scssoft.com/viewtopic.php?t=24924
- https://roextended.ro/forum/viewtopic.php?t=1776